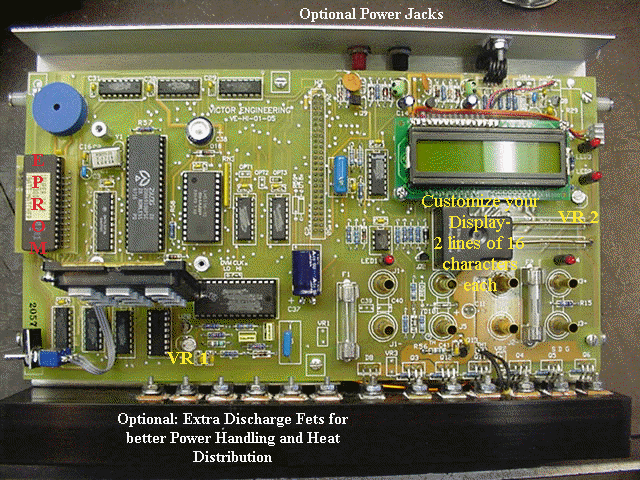

The EPROM contains the program for the operation of the charger.. i.e. IQ 3000 software. The one you see here is my own idea, this one contains 3 software's - IQ 3000, the older Super IQ with battery Shock / Revival feature, and the older Lin-R-Flex option, as you lose these when you go to the 3000 software, and the third is the Promatch software for Grading cells with a multiplexer.. Normally you would have to change EPROM's for the different software's, and this can be a real pain as you could bend or break a pin off the chip, so I came up with this modification and many of you have this upgrade..
(HOPE TO POST INFORMATION AND PICTURES ABOUT THIS SOON)
Calibration Procedure
VR 1 Is the voltage calibration pot.
VR 2 Is the current calibration pot.
When calibrating your Victor charger, ( Voltage calibration first!! ) place your charger in DVM function, ( Special functions, Utilities, DVM=1 ) and connect a single cell to the volt meter leads of the charger, next connect a High Quality! Digital Volt Meter in parallel with the Victor volt meter leads, and adjust VR 1 to match what your High Quality Digital Volt Meter reads! Special Note!!! Do not use any Radio Shack DVM's or any other that is under $250.00 as the ADC's in these meters are not Linear and are not as good as the one that is in your Victor Charger ( Remember your accuracy depends on the quality of your DVM that you use for calibrating!! )..I use High end Fluke meters for calibrating.
After you have calibrated the Volt meter section of you Victor charger you will have to calibrate the Charge Current section of your charger..You will need to connect a Digital Amp meter in series with a 6 cell battery and start charging your battery with the Victor charger, adjust VR 2 for the same current as what your external Digital Amp meter reads.
You can use a charge current of around 4 amps for your calibration... Remember to make small adjustments of the pot and allow the Victor charger to stabilize a few seconds before you make any other adjustments. Once this is completed your charger is calibrated and is ready for use.
